
Skip to main content
-
Getting Started
-
- Configuring Brand Settings
- Configuring System Settings
- Configuring Company Settings
- Currency Settings
- Proposal Print Settings
- Invoice Print Settings
- Purchase Print Settings
- Account Settings
- Bill Print Settings
- HRM Settings
- POS Settings
- POS Print Settings
- Email Settings
- Email Notification Settings
- Bank Transfer Details Settings
- Bank Accounts Settings
- Stripe Settings
- PayPal Settings
- Show Remaining Articles (3) Collapse Articles
-
CRM
- Articles coming soon
-
HR & Payroll
- How to Add a Branch in HRM
- How to Add a Department in HRM
- How to Add a Designation in HRM
- How to Add an Allowance Option in HRM
- How to Add a Loan Option in HRM
- How to Add a Deduction Option in HRM
- How to Add a Document Type in HRM
- How to Add a Payslip Type in HRM
- How to Add a Leave Type in HRM
- How to Add an Award Type in HRM
- How to Add a Termination Type in HRM
- How to Add a Tax Bracket in HRM
- How to Add a Tax Rebate in HRM
- How to Add a Tax Threshold in HRM
- How to Add an Allowance Tax in HRM
- How to Configure a Joining Letter in HRM
- How to Configure a Certificate of Experience in HRM
- How to Configure a No Objection Certificate in HRM
- How to Add an Employee in HRM
- How to Import Employees in HR
- How to Add Salary to a Specific Employee in HRM
- How to Generate Payslips in HRM
- Send Payslip to Employee via Email
- How to Download Payslip
- How to Mark Employee as Paid in HRM
- How to Delete Payslip in HRM
- How to Mark Attendance in HRM
- How to Mark Bulk Attendance in HRM
- How to Manage Leave Requests in HRM
- How to Manually Create a Leave Request in HRM
- Show Remaining Articles (15) Collapse Articles
-
Project Management
-
POS
- Articles coming soon
-
Accounting
- How to Create/Add A Customer
- Sending Invoice By Email
- How to Create A Invoice
- Inventory Adjustments
- Item Import
- Adding Products or Service Items
- How To Add A Bank Account
- How to Create a Purchase
- How to Create or Edit a Warehouse
- How to Transfer Products Between Warehouses
- How to View & Download Purchase Reports
- How to View & Download Warehouse Report
- How to Create or Import a Vendor
- How to Create & Edit Chart of Accounts
- How to Transfer Funds Between Accounts
- How to Create & Log a Revenue Payment
- How to Create/Add a Credit Note for an Invoice
- How to Create & Edit a Bill
- How to Log a Payment to a Bill
- How to Create or Add a Debit Note
- How to View & Download Transaction Report
- How to View & Download Account Statement Report
- How to View & Download Income Summary Report
- How to View & Download Expense Summary Report
- How to View & Download Income vs Expense Summary
- How to View & Download Tax Summary Report
- How to View & Download Profit & Loss Summary
- How to View & Download Invoice Summary Report
- How to View & Download Bill Summary Report
- How to View & Download Cash Flow Report
- How to View Product Stock Report
- Show Remaining Articles (16) Collapse Articles
Print
How to Sign In to Your ERP System
This guide walks you through logging into the ERP platform, which is ideal for first-time users or anyone needing a refresher.
Step 1: Open the Sign In Page
- Launch your preferred web browser (e.g., Chrome, Firefox, Edge).
- In the address bar, type your ERP system’s URL.
- Press Enter to load the Sign in screen.
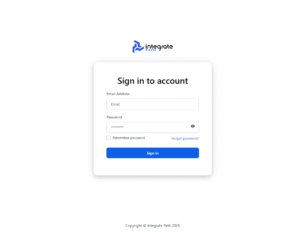
Step 2: Enter Your Email Address
- Locate the Email field (first white box under “E-Mail Address”).
- Click inside the box and type the email you registered with.
Example:your.name@company.com
⚠️ Double-check for typos—especially dots, dashes, and spelling.
Step 3: Enter Your Password
- Find the Password field (second white box).
- Type your password carefully.
🔒 Passwords are case-sensitive—Pass123 is not the same as pass123.
Step 4: Click “Login”
- Click the blue Login button below the password field.
- Wait a few seconds while the system verifies your credentials.
✅ What Happens Next
- Successful login: You’ll be redirected to your ERP dashboard.
- Login error: A red message will appear (e.g., “Wrong password”).
💡 If you’ve forgotten your password, click “Forgot Your Password?” to reset it.